


A Step-by-Step Guide to Assembling Ball Bearings
Looking to assemble ball bearings but not sure where to start? You're in luck!
Our step-by-step guide will walk you through the process with ease.
With clear instructions and helpful tips, assembling ball bearings has never been more fun. So, grab some tools, and let's get started!
Welcome, fellow DIY enthusiasts! Are you ready to tackle a new project that involves assembling ball bearings?
Look no further because we've got you covered! In this step-by-step guide, we'll show you how to assemble ball bearings like a pro, without any hassle or confusion.
Whether you're a beginner or an experienced hobbyist, our guide is designed to make the process easy and enjoyable. So, let's dive in and get started on your next exciting project!
Step-by-step process of assembling ball bearings:
1.Clean the parts
2.Lubricate the parts
3.Insert the balls into the cage
4.Place the cage into the inner ring
5.Align the outer ring with the inner ring and cage
6.Press the outer ring onto the assembly
7.Inspect the finished product
8.Test for proper function
With our comprehensive guide, you'll learn everything you need to know about assembling ball bearings.
Whether you're assembling bearings for a bicycle or a machine, this guide will give you the confidence to do it yourself without any hassle.
So why wait? Read on and let's get started on your next fun project!
What are ball bearings?
Ball bearings are mechanical components used to reduce friction between two moving parts.
They consist of small metal balls that are placed inside a ring or casing, which allows them to roll freely and smoothly against each other.
Ball bearings are commonly used in a wide variety of machines and applications, including bicycles, automobiles, industrial equipment, and household appliances.
By reducing friction and wear, ball bearings help to improve the efficiency, accuracy, and longevity of these machines, making them an essential component in many modern devices.
Importance of proper assembly
Proper assembly of ball bearings is crucial for ensuring their optimal performance and longevity.
If not assembled correctly, ball bearings can wear out quickly, causing damage to the machine or equipment they are used in.
Improperly assembled ball bearings can also create excess friction, causing the machine to run less efficiently and potentially leading to overheating or other mechanical failures.
Additionally, if contaminants such as dirt, dust, or moisture enter the bearing during assembly, this can greatly reduce its lifespan and cause further damage.
By following a step-by-step guide like the one we've provided, you can ensure that your ball bearings are assembled correctly,
minimizing the risk of premature wear and tear, improving efficiency, and avoiding costly repairs.
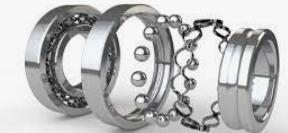
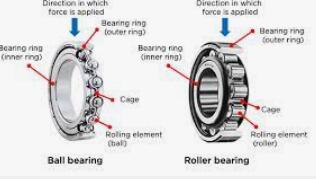
Parts of a ball bearing
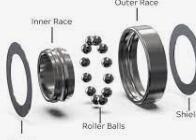
A ball bearing is a type of rolling-element bearing that consists of four main parts: the inner ring, outer ring, balls, and cage.
1.Inner ring:A circular component that fits onto a shaft, allowing it to rotate freely within the bearing assembly.
2.Outer ring:Another circular component that fits inside a housing or casing, providing support for the bearing and helping to keep it in place.
3.Balls:Small metal spheres that are placed between the inner and outer rings.
They allow the two rings to rotate against each other with minimal friction, reducing wear and tear on the bearings and improving overall efficiency.
4.Cage:A piece of material, often made of plastic, metal, or brass, that separates the balls and helps to keep them evenly spaced apart as they move within the bearing.
This prevents the balls from rubbing against each other and causing damage, while also ensuring smooth and consistent movement of the bearing.
Together, these four components work in harmony to create a functional and reliable ball bearing that can be used in a wide range of applications.
By reducing friction and wear, ball bearings improve efficiency and prolong the life of the machine or equipment where they are installed.
Assembly process
The assembly process of ball bearings typically involves several key steps to ensure a reliable and functional end product:
1.Preparation:Before assembling the bearing, it's important to clean and lubricate the parts. T
his helps to minimize friction and reduce wear and tear on the bearing over time, improving its overall lifespan.
2.Pressing the balls:The first step in assembling the bearing is inserting the balls into the cage.
This is typically done by placing the balls into the cage one at a time, ensuring that they are evenly spaced apart.
3.Placing the cage into the inner ring:Once the balls are in place, the cage is inserted into the inner ring.
This is usually done by aligning the slots on the cage with the tabs on the inner ring and gently pressing the two components together.
4.Attaching the outer ring:The next step is aligning the outer ring with the inner ring and cage, then pressing the outer ring onto the assembly.
This can be done using specialized equipment to ensure a precise fit.
5.Quality control:Once the bearing is assembled, it undergoes a final inspection to check for any defects or irregularities.
It is then tested for proper function, including smooth rotation and minimal friction.
Any issues are addressed before the bearing is packaged and shipped out for use.
By following these assembly steps and performing thorough quality control checks,
manufacturers can ensure that their ball bearings are of a high quality and will perform reliably over time, even in demanding applications.
Tips for assembling the ball bearings
Here are some helpful tips to keep in mind when assembling ball bearings:
1.Clean and lubricate the parts:Before beginning assembly, make sure to thoroughly clean and lubricate all of the parts.
This will help to reduce friction and ensure smooth operation.
2.Use specialized tools:When inserting the balls into the cage, use a specialized tool to ensure that they are evenly spaced apart.
This will help to prevent them from rubbing against each other and causing damage.
3.Check for proper alignment:As you assemble the bearing, make sure that all of the components are properly aligned.
Misalignment can cause excess friction and wear on the bearing, reducing its lifespan.
4.Be gentle:When pressing the outer ring onto the assembly, be careful not to apply too much force.
Doing so can damage the bearing or cause it to bind up during operation.
5.Perform quality control checks:Once the bearing is assembled, perform thorough quality control checks to ensure that it is functioning properly.
This includes checking for smooth rotation, minimal friction, and proper alignment.
By following these tips and taking care during the assembly process, you can ensure that your ball bearings are reliable and long-lasting, even in demanding applications.
Conclusion
In conclusion, the process of assembling ball bearings may seem daunting at first, but it can be a rewarding and satisfying experience when done correctly.
By following our step-by-step guide and keeping in mind some helpful tips, you can assemble ball bearings like a pro with confidence and ease.
Whether you're a DIY enthusiast or an experienced professional, mastering the art of ball bearing assembly is a valuable skill that will serve you well for years to come.